Saturday, January 08, 2011

Canine Refreshment Station

Or, if you are from Wisconsin, "The Doggie Bubbler"

1/5th size steam-table pan
Faucet from the clearance shelf at Menard's
Too many plumbing fittings and attachments from the hardware stores (multiple trips req'd, of course)
A solenoid valve from eBay
90 degree through-hull fitting (adapted to use as the overflow)
Leftover tiles
Leftover pre-finished cabinet plywood

Voila:


Of course, I still have unpainted window trim in this place; but this sure is cool!

Tuesday, September 14, 2010

Cable Rail

I finished the cable rail for all but the deck stairs this past weekend.  A machine shop made the terminals for me from 5/16-24 SS threaded rod.  I made a crimper from an old set of bolt cutters.  The cable is 1/8" SS.


Friday, August 27, 2010

Steel Roofing

I'll probably finish by wrapping the columns in another month or so.  As you can see, I opted against the small gable, but now I know I'll need to put some "snow gems" or other device to prevent snow from sliding down onto the steps.

The next project is to finish the cable railings around the front porch and back deck.

Friday, November 27, 2009

Front Porch Rough Construction

This is probably it for this year.  I'll put together the materials list for the tapered columns, metal roofing, soffit, and fascia over the Winter and then finish it up in the Spring.  It will be nice to not have to worry about the snow pile in front of the front door.  We are still debating if we'll put a gable above the front steps.  I've attached a "SketchUp" concept of what it might look like.


"Fingers Crossed" that the tar paper lasts through the Winter.

Tuesday, November 03, 2009

Stone Work Finally Finished

The last few stones were put in place by the light of our 98' Beetle, but they are done!!

In retrospect, maybe I should have given up on this "dry stack" look. This was a lot of work. . .

Next up are the tapered columns and porch roof.


Monday, September 01, 2008

More Stone Work


I've finally finished the largest section of the natural thin stone veneer. This wall section is about 4 x 44. I tried a few different methods of organization, but, in the end, the most effective was laying out the stones by size.


I still have the small section of exposed foundation under the master bath bumpout and three front columns, but this was a great "milestone" to reach.


Thursday, October 11, 2007

Natural Thin Veneer


This is the result of 2.5 days of work - one stinking column! I had a friend show me how to do this for the first half day. It then took a full day on Sat and Sun to finish the column.


Because I am doing the "dry stack" look and this is a column, I have to trim or grind almost every stone. I am pleased with the results


Other than this, it's really just been small projects. I have the railings up on the front and back decks, but don't have the cables in yet. Other than that there have been some small projects inside.


The reason I am finally jumping on this masonry is that I need to get the pallets of stone out of the garage because that's where the pontoon boat goes in the Winter.

Thursday, June 28, 2007

Front Porch Steps


With family coming into town this weekend, we have been really busy wrapping up some of the bigger undone items. We are still far from done, but these porch steps were a big thing to get out of the way.
I am guessing that folks will either say "Cool!" or "Yuck!".
The form and function behind these steps are as follows: The "form" is to tie into my design goal of "contemporary craftsman". The "function" is that since we are in WI, they don't need to be shoveled, only stomp your boots clean.

Of course, this now means we need to get the sidewalk in soon. . . . . *sigh*
I guess these pics also show that the block and capstones are done for the pillar bases, too. Still needed are the thin stone veneer on the bases, the tapered columns on top, and the roof above.

Tuesday, March 06, 2007

Views from the Loft, Bonus Room, and Upstairs Bedrooms

Not much going on in the bonus room for now, but the two bedrooms and upstairs baths prove we ain't afraid of color!


Great Room at Kitchen

When you pass from the small (intimate?) foyer and office area, you pass through a short hall that gives access to the half-bath or the master suite. Continuing ahead, leads into the Great Room / Kitchen Area.


We're In (but far from done . . . .)

We moved in about 2 weeks ago with an OK from the inpector. We'll call him back in May when the front porch and back deck are done. There are lots of little things that need to be finished, but a few big things, too. The biggest stuff still remaining (in my mind) are kitchen counters, paint the trim, and finish the tile and grout in master bath.

In any case, I'll try and post some interior shots over the next few days.

Here are a couple of pics of the office and front entry area/foyer. Oh - the foyer is not properly trimmed out, either. We want to do that in a darker wood and are putting that off for now.


Friday, December 29, 2006

Recent Exterior Picture


Here is a recent exterior picture.

It's nice to have the grading done (and even better when the ground stays frozen so the dogs don't get muddy).

The gaps in the siding are for window sills and craftsman style brackets yet to be made. The porch roof rafters you see had to be installed prior to siding going up, not sure when we'll get to that roof (or the other metal roofing on the bumpouts).

What do have to do is get the steps installed in the front and finish the deck. Not sure how we'll handle the railing for the inspection. . . .

Stay tuned - not long now - lots going on inside.

Monday, December 18, 2006

Great Room Box Beams


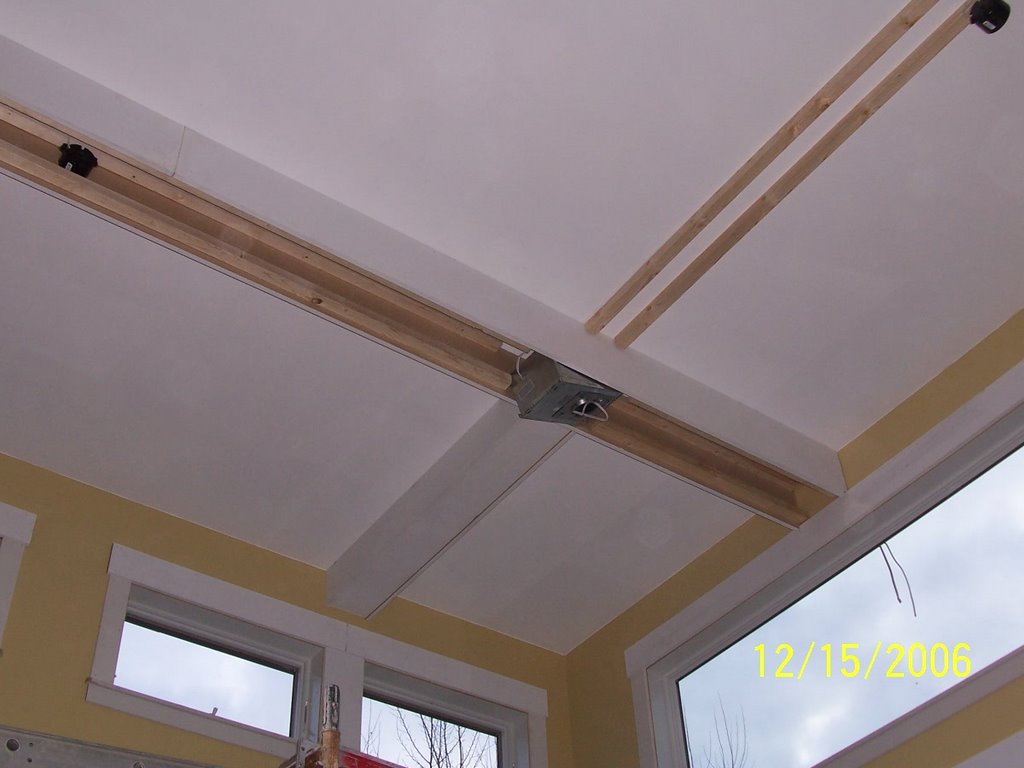
It was a busy weekend. The wood nailers were already installed, but on Friday I finished up the wiring and, at the end of the day, we had most of one big beams (made with 1x10s) up and all of one small one (made with 1x8s).

I told the builder that I'd pre-build all of the small beams so they could be cut to size and that I'd prep as much of the large beam parts as I could over the weekend. Then we could all work together on Monday to put up the parts.

Saturday morning, I set up a long table with a 16' 2x10 and a couple of 16' 2x4's on edge. I organized all the parts and tools and got started. The small beams all have a "routered" dado to accept the bottom panel. To my surprise, I had the parts all done (cut, routered, glued and nailed) before noon so I just started putting them up. With some help from the wife on the long parts, it was all done by 5pm on Sunday. (this also includes a "break" Satruday night were we grouted the kitchen tiles).

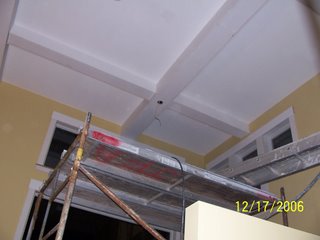
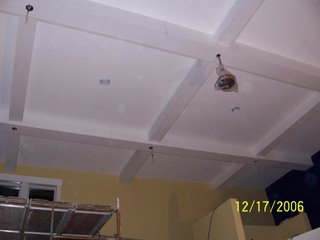
There is a lot of nail-hole filling and seam caulking to do, but I think these just look awesome! The pictures don't do justice to how it changes the feel in the room.

Plus, it gives me a place to mount lights (including track lights on the side of some outer-most beams) that don't create spots for warm air to leak out. Sure, there are a couple of IC cans and a couple of HVAC supplies in the ceiling, but much less than I would have had if I had to put all the lighting through the ceiling sheetrock.

(PS - white painted MDF trim may be scoffed at by some, but, for my skill level, it is wonderfully forgiving with a little caulk and putty. . . Also, in case anyone is wondering, the beam support nailers are screwed into the trusses and to some preinstalled supports between trusses with 4" screws)

Sunday, November 26, 2006

Master Suite (or, for the PC, "Owner's Suite")

Coming through the foyer "airlock" door, there are three directions to go.
Straight leads into the GreatRoom
Right leads into the Powder Room
Left leads to the Master Suite.
This image is looking from just inside the Powder Room door into the Master Suite. The door straight ahead is into one of the closets, the door to the left is into the bathroom.


This is the view into the master bath. It is hard to capture details on this room at this point, but we'll post new pics when the fixtures are all in place. On both sides just inside the door will be the two vanities. We wanted to enclose the toilet in its own little room, but I didn't think we had the space to do that.


Looking the other direction, this is the view of the hall with closets on both sides and out to the sliding door at the back (lake side) of the house. As we played with layout ideas, we thought it would be best to maintain this long sight line, but still prevent a view into the bedroom when just passing by outside. Building one large closet was the other option that we decided against.


These last two pics are of the main part of the bedroom - taken from opposite corners.

Foyer, Office, and Powder Room

The front door does not open into the center of the foyer, it is offset to one side. This first picture is what you'd see when coming through the front door and looking left. You can see the 3 square windows on the left and the door that leads out into the greatroom on the right. We put a door on that end of the foyer to act as an "airlock" in the Winter. It will be a single panel, interior door with a glass panel. We just want to stop a big dump of warm air to the outside. We don't have a side door so all visitors will enter through the foyer. We plan on tiling in here so it is easy to maintain.

This is the view looking back towards the front door. The angled door to the left is the entrance to the office.


This is the view from the office out into the foyer. The doorway just to the right is the pocket door that leads into the Powder Room. If you go through our "airlock" door, there is regular door that opens into the Powder Room from the other direction.


This is a view from the office through the Powder Room.